Writing a check is not that popular these days, thanks to technological advances. Nowadays, people can pay for transactions using credit cards or debit cards. In some other cases, all you need to do is swipe your smartphone via a payment terminal and head out the front door.
Do you still sit down to write checks each month to pay for utility bills? It sounds like something we used to do years ago. However, while you should not expect check writing to come back, chances are you may have to write one at some point in your life.
It could be a check for your monthly rent. Maybe an installment for an exciting investment like a house or a new car. You may feel benevolent and decide to send your best friend a snazzy gift. Regardless of the case, you may find yourself in a situation where you need to bring out the old paper and pen.
Therefore, it is important that you learn the proper way to write checks. Most people wait until they reach college, so you should not feel embarrassed if you are reading this while hiding in some corner of your university library.
Parts of a Check
If you have come across a check but have not written one yet, then you must be wondering what the lines, numbers, and boxes mean. Well, you won’t have to guess anymore. Here’s an explanation of what they mean.
- Personal information, including address, and in some cases, phone number
- Check Reference number
- Date line
- Recipient’s information line
- The line for Payment amount
- Box for the payment amount
- Bank details
- Memo line
- Signature line
- Bank routing number
- Personal Checking account number
How to Write a Check With Examples
Filling out a check is easy, as long as you follow the steps provided below
1. Provide a date on the line in the right upper corner of the check
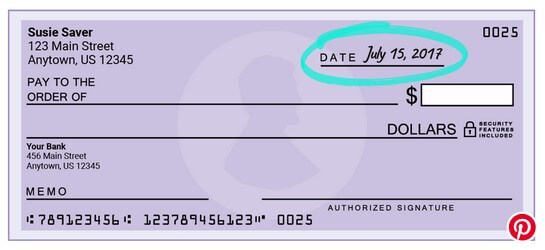
Note the date, month and year on the date line in the top right corner. In most cases, this will be the date on which you wrote your check. However, if you want your recipient to wait a few days until there is enough money in your checking account, you can post-date your check.
In addition, you are allowed to post-date if you are making a payment ahead of time. For instance, if rent is up for payment on 1 October 2019, but you tend to mail the check in the middle of the previous month, you can post-date your check to reflect 1 October.
2. “Pay to Order of” implies the business or person you are paying
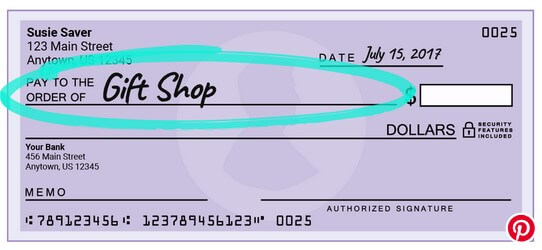
On the field marked ‘Pay to the Order of.’ write the payee’s name. If you are unsure about the business name or proper title, inquire before you write your check so that the recipient will not have problems when depositing it at the bank.
Ensure you do not leave that space blank, ever, when writing your check. Someone else might write their own name and cash the money.
3. Indicate, in words, the dollar value you are paying via your check

That would be the line right below payee’s name. Write the dollar value you are paying via your check, in word format. For instance, you could write twelve dollars and 18/100. Both styles are okay, as long as the value you are paying is legible.
If your writing does not occupy the entire space, draw a horizontal line through that space so that no more text can be added thereto change what you have already written. Also, ensure you do not write a check with a pencil. The information on the check can be changed easily.
In the past, banks preferred that checks be written in cursive text. However, nowadays, writing a check in permanent ink is enough proof of legitimacy.
4. Indicate Amount, in digits, inside the box on the right side of your check
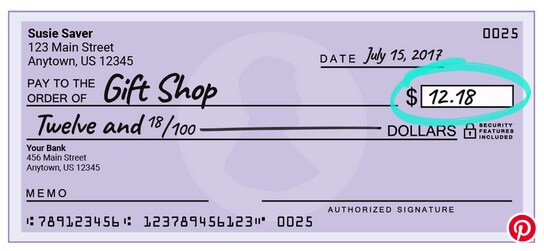
Indicate the amount you are paying via the check within the box on the right side, but in numbers. Check to confirm that the amount in words and in numbers tally. Also, write the amount in digits within the entire box, so that no one can alter the digits. Alight dollar values to the left of the box to ensure your 12.18 cannot be altered to read 112.18.
5. Include a Memo, if you wish to
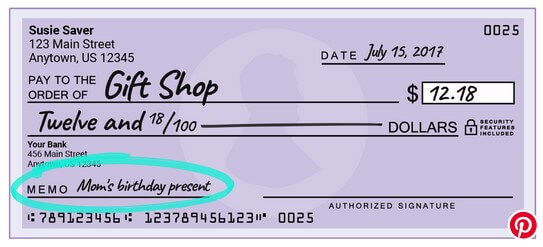
This section is usually optional, but there is no harm in writing the reason you are issuing the check. It comes in handy when issues arise and there are questions that need to be answered. In addition, some recipients prefer that you include identifying information in the check, liking billing numbers.
6. Sign your check at the bottom right corner
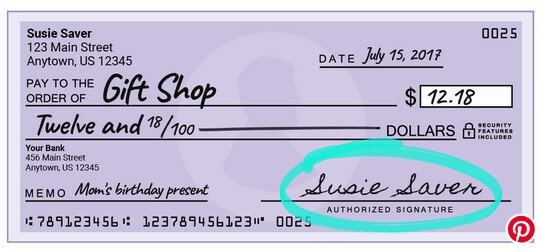
The recipient will not be allowed to cash the check without your signature. Ensure that the check is signed with your details exactly as they appear on the check. You should never sign a check unless you have filled all the other details. This is important in the fight against fraud.
Routing Number and Account Number
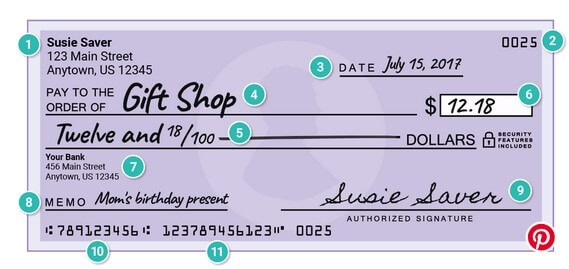
The part labeled 10 is the routing number or the code that identifies your bank. The next one, marked 11, is your bank account number. Some checks come with a third group of characters, which represent your check’s number as shown by item 2 in the sample check above.
Sometimes, you may have to provide your bank routing number and checking account number when processing payments online via a checking account ‘e-check’. You should never provide your bank account number except where you are sure that your transaction is running on a secure platform.
You should only transact via “https:” platforms, and not “http:” Also look for a lock symbol on the web address of the platform you are visiting. Moreover, do not ever provide your checking account number is you are browsing using an unsecured public Wi-Fi.
Wrap Up
Knowing the right way to fill a check is important even in this age of technology. Some people still pay rent or buy goods from merchants using checks, particularly those who do not accept debit or credit cards. If you ever have a need to write a check, the procedure we have listed above will help you get started. Happy Checking!